Monday, August 31, 2009

Sally Beauty Haul

After watching a few vids from one of my fave girls on YouTube (VintageorTacky), I knew I HAD to rush out and get a few things from my local Sally Beauty. The *rush* part came from a recent video she did on how to make your own glitter eyeliner/shadow. I'm all about cutting corners in an effort to not spend $15-20 a pop on a product that I either a) can make myself, b) will probably dry up before I finish it, or c) might only use once or twice. So the product she was using was the Sparkle Effect Gel Adhesive for glitter by Sally Girl, available only at Sally Beauty for about $1.29.. She used an empty palette for mixing and combined some of the gel and a dash of loose glitter. The color that she applied to her lids in the vid was the Crystalled Lime (think that was it..?) pigment from MAC over a lime green shadow she already had on and the effect was sooo gorgeous. You can view it here..

http://www.youtube.com/watch?v=sMNg1LZ35yw&feature=channel_page
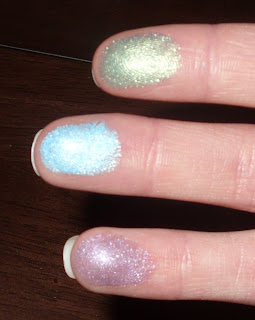
She had also mentioned before in a different video that her friend was obsessed with the Sally Girl eyeshadow that actually hook together... I was in the mood yesterday for some fun and bright shades so I picked up these guys: (Click to enlarge for better pics)


From left: Quad in Moolah, Singles in Emerald, Aqua, Turquoise and Purple Passion

and here they are swatched. And yes, they are backwards, I know :(


In addition to the brights, I thought this Moolah quad looked eerily similar to the new MAC PhotoRealism quad so I picked that up... the colors are not as pigmented and there are a couple differences with the colors.. the dark forrest green on the bottom right should have a little hint of bluish black and the brown on the bottom left should be more of a greyed green but for $.89 instead of $36 I believe it is.. I'll probably just stick with this one and see how I like it before I rush out and get this quad that everyone is loving. At Sallys, I also picked up another Duo eyelash adhesive in clear because the Sonia Kashuk one I had been using before was now irritating my eyes for some reason.. Overall, very happy with my purchases, I believe I made it out of there for under $12 for 7 items (all Sally Girl items were buy 5, get one free!) I'll be posting reviews of all of these items once I have a chance to test em out. Can't wait to play with all the fun new colors!

Saturday, August 29, 2009

Bliss Blood Orange & White Pepper Body Butter Review

Picture courtesy of Blissworld.com

Whew, what a name! The first thing that struck me about this body moisturizer is the interesting combination of blood orange (a longtime fave scent) and white pepper.. Is this lotion going to make me sneeze? Hehe.. Not at all, as it turns out. The scent of this has actually turned into a slight obsession for me. The blood orange in it is very present and just begs to be sniffed but for some reason it reminds me of late fall.. Like when the Christmas rush starts and the Christmas-y scents come out. I'm thinking maybe I'm translating the white pepper into clove? Whatever it may be, the scent is definitely addictive and I really like it.

But of course this isn't a perfume, and this baby lays down the moisture pretty nicely as well. I didn't notice any greasiness after a few minutes (would wait a few before dressing though), and hours after I can still feel this incredible softness wherever I've rubbed in the lotion. My one drawback.. and unfortunately its a biggie.. This lotion sells for the not-so-bargain price of $35 for 8.5 ounces on blissworld.com or through their catalog. The scary part is, if this was the only lotion you're using, you'd go through more than one a month and for me at least, thats just WAAAY too much to spend on lotion. Maybe for a special occasion, or if you get a particularly nice paycheck, this would be an awesome splurge as a little treat for yourself.

Upcoming Local MAC Events

For anyone that lives in the Inland Empire in California, I'd love to see you at one of the upcoming MAC events at the Macys in Inland Center Mall to talk about MAC, makeup, beauty and everything else.. The dates are:

Sept 6- Eyelashes and Eyeliner Extravaganza, 12 noon.
Sept 12- This one I'm really excited about! They are bringing in MAC trainers and celebrity makeup artists Yaminah Salahieh and Jessica Roberts to do a Studio Talk seminar on "the new diva- the look of Kim Kardashian" 11-1 or 3-5p.
Sept 13- Smokey Eyes, 12 noon.
Sept 20- Mineral Makeup, 12 noon.

These are all no-cost/no obligation to buy with the exception of the MAC artist talk on the 12th. This class requires a $50 reservation fee which is redeemable for $50 of makeup or whatnot at the end of the class. I should be at all of these classes unless something else comes up, but be sure to let me know if you're coming so we can meet! On a side note, I already went to one of these classes and had a blast, they gave out some free makeup, LOADS of tips and tricks that only MAC artists know and I think its really great to get to know your salespeople.. They can set things aside for you they know you'll like or limited edition items before someone else snags em, let you know when the new collections are coming out, help you pick out things based on previous purchases, etc. Its a mutually beneficial relationship that every makeup girl should have :) 

Victoria's Secret Haul

Now the only reason I keep my Victoria's Secret credit card is for the perks.. Every year, on the month of your birthday, they send a $10 gift card with no strings attached, and this year included an extra bonus of the Slice of Heaven Beauty Rush lipgloss! Fabulous! So I went in yesterday to redeem the card on some underthings for myself, and as always got distracted by the displays of Beauty Rush items in the checkout line. I've always been intrigued by the eyeshadows which look gorgeously shimmery and metallic. And because my VS was out of 90% of the new makeup collection (BUMMER!!) that I was planning to pick up a few fun colors from, I figured, hey why not!? So I grabbed the Slice of Heaven and a Passion Fruit Punch lipgloss, along with a cream eyeshadow in a shimmery champagne shade for my best friend (gave them to her last night so I don't remember the name..) and for myself, I picked up the following:


Wet/Dry eye shadow in (clockwise from top left):
Glamerald
Violet Femme
Blueray
and Lipgloss in (from left)
Red Delicious
Hot Cocoanut

I haven't opened the Red Delicious yet but I'm already in lust with the Hot Cocoanut.. I wore it last night with my Green Smokey eye look and the color is a really subtle transparent nude with sparkly (but not overly glittery) gold flecks. The smell is also incredible- like tanning oil! Yummy...

And here are swatches of the 3 eyeshadows,
from top to bottom,
Glamerald
Blueray
Violet Femme
I'm soooo excited to play around with these shades,
they look so fun and metallic. They are also promoted as wet/dry shades, so I can imagine the brilliance of these colors when applied with a mixing medium/wet base.
Look forward to my reviews on these, as well as some FOTD's using these products!

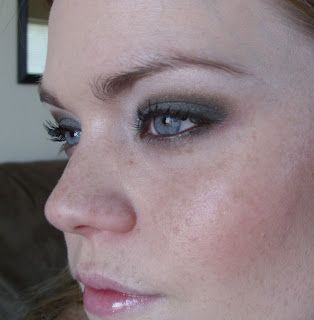
Smokey Green FOTD

I *really* like doing a not-too-dramatic smokey eye for daytime and decided to try a dusky green version.. Tell me how you like it!

Eyes
MAC Paint in Stilife

L'Oreal HIP Cream Shadow Paint in Steely

Lancome shadows in Limelight, Montage & Blink

La Femme Sparkle Dust in Champagne Gold

Lancome Le Crayon Kohl in Black Coffee

Maybelline XXL Extensions Mascara in Black

Cheeks
Laura Gellar Blush-N-Brighten in Pink Grapefruit

Face
Stila Perfecting Foundation Stick in Shade A
MAC Studiofix Powder Foundation in NC15

Lips
Sephora Sweet Candy gloss in Peach Blossom


Tuesday, August 25, 2009

Seaspray FOTD (Face of the Day)

Eyes:MAC Paint Pot in Painterly
Lancome e/s in Amber Mystique
MAC Guacamole, Gorgeous Gold, Tease N Teal and Gingersoft
L'Oreal On The Loose Shimmer Powder in Tart
Wet N Wild Kohl Eyeliner in Turquoise
Stila Major MAJOR Lash Mascara in Black
Face:
MAC Studiofix Fluid in NC15
MAC StudioFix Powder Foundation in NC15
Milani Luminous Blush
Lips:
Lancome Juicy Rouge Lipstick in Baby Rose
Victoria's Secret Beauty Rush Lipgloss in Mango Madness

Photobucket


Seafoam FOTD eyes

MAC VIP Makeup Class

I was so lucky to be invited to a VIP class given at my local Macy's hosted by MAC artists this last Friday night and I was really excited getting ready for it because I didn't know what to expect. It was my first MAC class, and I have to say that I was pretty impressed! The artists were so friendly (I actually went to school with one of them!) and extremely patient with some of the makeup newbies in the class, as well as explaining step-by-step their techniques and the products they were using.

One of the products they used throughout the class was the Fix+ which is a product I already have and would recommend everyone using, if you're not already. It is described by MAC as a skin refresher/finishing mist but it can also be used to moisten brushes before foundation, eyeshadow, glitter and brow powder application to make everything blend well and stay on longer, as well as acting as a base to draw in moisture when sprayed on a fresh face and to essentially "refresh" your makeup if it starts to look cakey throughout the day.. I have also read that this helps some people with reducing redness and calming inflammation. There are so many uses and benefits of this product, but a couple of the fun ones are the cool misting sensation (especially when put in the fridge, a tip from the artist) and the fantastic fragrance it has. 

So she started out by prepping the bare skin with the Fix+, followed by the Studio Moisture Fix Spf 15, which is a product I personally have never tried because I am super satisfied with my Garnier Nutritioniste Skin Renew Daily Moisture Lotion with Spf 28 which is less than half the price of the MAC one and has additional benefits.  

Next, she started on the brows, which is something I never really thought to start with, but is a technique I will be trying out in the near future. She sprayed an angled brush (#266) with the Fix+ then dipped it into Dipdown Fluidline eyeliner. Now of course when she did this, everyone in the class kind of looked at each other, eyeliner as brow definition? But it worked really well, the artist said because it is waterproof, matches a lot of skin tones and is quite opaque. I was suspicious so I asked the artist if that shade would work on me (uber-fair) and she recommended Rich Ground fluidline or Omega, Kid or Wedge shadows instead for lighter complexions. The technique she used on the brows is to essentially sketch an outline of the brow shape and then fill it in, along with using a little flicking motion upward at the outer corner. I have tried this technique since on myself and a few others and it looks great! 

Next, she used a flat eyeshadow brush to apply concealor in a color 2-3 shades lighter than the model's skintone right up underneath the sketch line on the brow bone, which helps to conceal any stray hairs and acts as a subtle highlighter. 

For the rest of the eye, she prepped with the Paint Pot in Painterly (one of the items I purchased after the class, review to follow soon), using the #252 brush. Next came a technique I'm having a little trouble mastering but it makes sense.. To use a matte crease/transition color right in and a little bit above the crease on mostly the outer lid to create dimension, especially when using accompanying shimmer, frost or glittery shades. She then used colors from the new Photorealism quad, which is a collection of some gorgeous softer green colors. The frostier shade was applied to the inner corner and the rest of the lid. The tips she gave during this step were to look down into the mirror, as opposed to looking into it straight on, to better locate the crease and find where the light is being caught on your eyes. She then used the brighter shade thicker in the outer crease and then again in the inner crease but leaving a gap between them and blended them to meet a bit shy of the middle of the eye. Lashes got a coating of Plushlash mascara in black. This was the completed eye for the day look.

For the rest of the face, she used the Studiosculpt Foundation mixed with a few drops of the pinky shade of Lustre Drops (Pink Rebel). This gave a nice glowy, but not overly dewy look. Her technique with contouring was the E/3 method.. essentially creating an "E" or "3" shape by applying bronzer down the hairline, sweeping under the cheekbones, and then sweeping again along the jawbone. On the model, she used the Mineralize Skinfinish in Sunny by Nature (a rich bronze with pink pearl). 

Lips got a soft outlining of the Stripdown liner, a very neutral, wearable brown/beige shade that works with SOOO many lipcolors. She topped this off with a slightly frosted beigey-pink creme lipstick and a gorgeous gold-flecked lipglass. 

This completed the day look.

The only real transformation from day to night was to intensify the night and refresh the face. First, another mist of Fix+ helped to even out the skintone by reducing any buildup of product in a specific area. She then deepened the bronzer with another E/3 sweep and used a contour brush to apply just a tiny bit of the lustre drops to the top of the cheekbones, down the nose, and on the temples for a nice additional perk-me-up. For the eyes, she used a #219 brush to smudge in some of the deeper greyed-green shade from the previously used Photorealism quad right in the outer v and blending it in slightly. I'm really excited to try out this brush and it actually came in one of the brush sets they had, I just hate to buy a set when I already have some of the brushes in it or know I won't use one or more of them. The set was $49.50 for 5 brushes and an adorable case, if they still have the white or black set available at your nearest MAC store, I'd definitely recommend buying either or both of them if you're looking to jumpstart or add some really nice items to your brush collection. The finishing touch on the night look was a heavy-handed dose of the gold glitter from the new collection- which looked fantastic on the eyes, but the fallout on the cheeks and, by the end of the class, on the lips and chin, was not so pleasant. I would have mixed it with a stronger base (other than the Fix+), either Paula Dorf's transformer or MAC's mixing medium to cut down on fallout and prolong staying power or switched to a product that has pigment, as well as glitter, which will make the product stick to the lid better.  

Another exciting thing that happened (along with the great tips and tricks I learned) was that I won 2 products (a Shadestick in Butternutty and Lipstick in Madly Creative) just by answering questions in class! I'm so grateful and will have swatches of them up soon. Here is also the list of items I ended up getting after the class:
StudioFix Fluid in NC15
StudioFix Powder + Foundation in NC15
Paint Pot in Painterly
#188 brush (for foundation, powder, blush, etc., this is a very multi-use brush)
Powder Blush in Well Dressed


Photobucket
  

Sunday, August 23, 2009

Discount Store Haul #1

So I was doing a little shopping with my mom yesterday and we were in the neighborhood of one of the places she stops by sometimes and decided to take a peek inside. I was pleasantly surprised by the selection of makeup they had available.. and everything was at the bargain price of 99 cents! The first items I saw were 2 palettes from Kleancolor in #'s 36602 and 36601. At first glace, they appeared very metallic and just gorgeous shimmery colors.. The #36602 has some bronzes, silvers, coppers and purples and #36601 has a great mix of beige, coppers, green and blue. When I got home and tested them out they were very smooth and blendable. The only issue I have is that with this collection, some of the colors repeat in the different palettes. Next, I found a Revlon eyeshadow trio in Show Stopper Copper, which includes a soft, slightly shimmery ivory, a brighter copper with medium shimmer, and a bronze with just a touch of metallic shimmer, all of which are very smooth and compliment each other beautifully. Lastly, I came upon a Physician's Formula wet/dry bronzer in Baked Bronze. This one I think I have some issues with- the color shows slightly orangey on my very fair complexion and the shimmer might be a little but much for daytime. I'm going to play around with it though and update with swatches very soon. 


All of this for under $5. I was definitely a happy makeup addict yesterday!

Thymes Essentials AHA Body Lotion Review


                                      Picture courtesy of Thymes.com

First impressions: This has a very clean green citrus scent, made skin noticeably smoother after use, not tacky, soaked in quickly.

Price: $24.00 for 9.25 oz. Easy to Find: Thymes.com; other etailers; Larchmont Beauty Center, etc. Scent: green citrus. Greasiness Factor: almost none. Liklihood to buy again: medium. Overall: high rating for the scent and sinking-in factor, however $24 is a little steep when there are comparables for less.. nice to use for special occasions, when skin is dry and in need of a moisture boost. Otherwise for everyday use, its a pass.

Description from Thymes.com's website: Treat your skin to the gentle exfoliation of Thymes own alpha hydroxy acid fruit complex that smoothes and softens skin as shea butter and vitamin E moisturize.

Fragrance: A refreshing Mediterranean blend of Italian tangerine, orange and lemon, red currant, dewy jasmine, petitgrain, cyprus, a touch of sheer musk and sun-drenched grapefruit. Perfect for the whole family.
Gentle fruit & sugar acids exfoliate Smooth, fast-absorbing formula

Ingredients: Water, Glycerin², Glyceryl Stearate², Caprylic/Capric Triglyceride¹, Isopropyl Myristate¹, C12-15 Alkyl Benzoate, Fragrance, Cetearyl Alcohol¹, Bilberry Fruit Extract, Tridecyl Stearate¹, Neopentyl Glycol Dicaprylate/Dicaprate¹, Cetyl Alcohol¹, Hydroxyethyl Acrylate/Sodium Acryloyldimethyl Taurate Copolymer, Shea Butter, Sugar Cane Extract, Sugar Maple Extract, Orange Fruit Extract, Lemon Fruit Extract, Ceteareth-20¹, Polysorbate 60², Tocopherol², Isohexadecane, Tridecyl Trimelliate, Dimethicone³, Trisodium Ethylenediamine Disuccinate, Citral, Hexyl Cinnamal, Hydroxycitronellal, Limonene, Linalool, Phenoxyethanol
Source: ¹Coconut and/or Palm, ²Mixed Plant, ³Silica

My first post!

Ok, I'm really excited to finally get this blog up and running- believe me when I say it's been a long time coming! After I get acclimated to blogging, I will be starting up a youtube channel as well for tutorials, reviews and possibly some hauls. I'm going to start on here mostly by doing reviews but my passion is the actual art of makeup application so tutorials will definitely be next! Hope you all enjoy, I welcome any questions or comments!